Satellite Images in iGO Primo GPS Apps
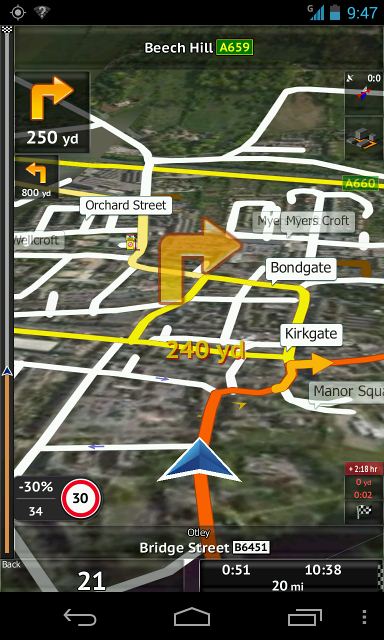
iGO Primo has the ability to display images of the terrain underneath the roadmaps it displays.
In theory you can buy these images, but it seems to be incredibly hard to do that. So it's a good thing you can make your own!
This page gives just the basic details of how to do it.
Making raster images for iGo Primo
There are a few steps in the process, and although it is not difficult, it is not all that intuitive!
Firstly you need to source the images to show. There are several providers of satellite images, but the only ones I have used are Google and Bing.
Once you have collected the images, you have to create individual .jpg images that each cover 0.125 degrees of longitude and 0.125 degrees of latitude.
These images then have to be converted to a specific file format with the file extension of .rst.
Then the .rst files have to be assembled together into a .raster file that you load onto the device running iGO.
Collecting the software
For the first two steps the best tool seems to be a program called SAS Planet. It is pretty easy to find with a Google search, though the first version I found was all in Russian (a language I can't read) until I found a "debug" version that worked in English. As far as I can tell, the current "Nightly" version is the best: https://bitbucket.org/sas_team/sas.planet.bin/downloads/SAS.Planet.Nightly.210504.10128.7z There may well be other programs that can do this job.
For the second two steps, the only tool I know of is NNG Raster 3.1.5. This was tricky to find and seems not to have been updated since 2011, despite some obvious scope for improvement in usability. At least it exists and it does work!
Downloading satellite images with SAS Planet
In SAS Planet, press Alt+R to make a rectangular selection, click at the top left (NW) corner of the map area you want to select, then click at the bottom right (SE) corner. A dialog box will open. Cancel this to close the dialog box.
Look at the map. The area you selected should have a black line round it. If it is wrong, start again.
If it is about right, go to the Operations menu, Selections Manager, By Coordinates. Here you need to fine-tune the selection you made when you dragged a rectangle.
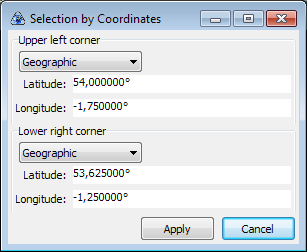
The area you have selected needs to start and finish on increments of exactly 0.125 degrees. For example, if you dragged and got the top left to be Latitude 53.999506° Longitude -1.673985°, change it to Lat 54° Long -1.750°.
Once you have the corners set to 0.125 increments and the rectangle is a reasonable size (I'd suggest no more than 2 degrees high or wide to start with), click Apply.
In the dialog box that opens, the Download tab is selected.
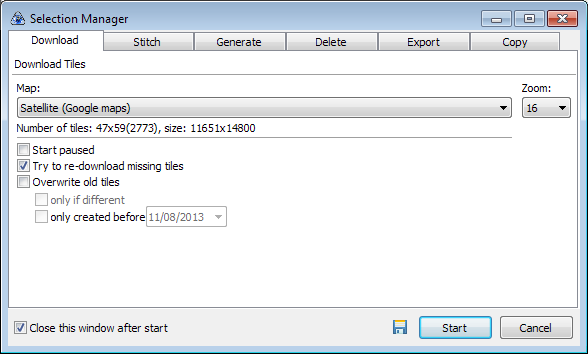
Choose the source of the download. Basically you can choose between 'Satellite (Google Maps)' and 'Bing maps - satellite'. Don't forget to do this for each download.
In the Zoom box, choose 18. This seems to be the best setting (the screen grabs show 16 which is not as clear, but more Google-safe). Click Start and the sections of map are downloaded.
When the download completes, click Cancel to close the dialog box.
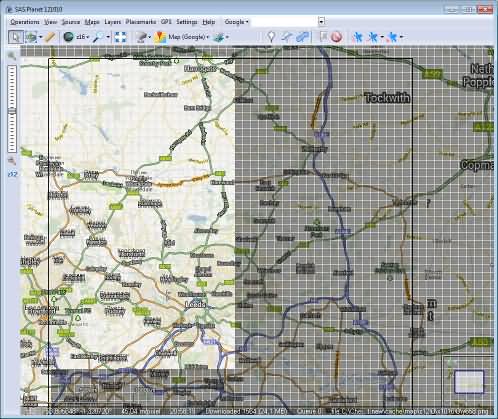
Building image tiles with SAS Planet
Still in SAS Planet, press Ctrl-B to reopen the Selection Manager with the same area selected. Select the Stitch tab.
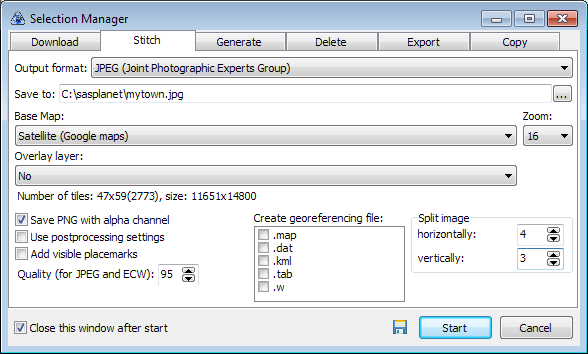
Choose Output format: JPEG (Joint Photographic Experts Group) and use the ... button to choose where to save the files and to give them a name. For this example, I used 'mytown'.
In the Base Map: field, choose the same source (Google or Bing) that you downloaded, and the same Zoom (18 or 16). Note that these are not the defaults: you will need to change them over and over again.
In the Split image boxes, select how many tiles of 0.125 high and wide your selection was. For example, if you selected N54.0 E-1.750 as the top left and N53.625 and E-1.250 in the bottom right, your area is 3 high and 4 wide.
I'm told that iGO can only handle up to 256 tiles at a time, so you will need to scale the tiles to cover the area you need in fewer than 256 sections.
Click the Start button and your tiles are created.
Converting images to Raster files in NNG Raster
In NNG Raster, type the name of the region your raster will cover in the City field. Then click OK. The Country and Source fields change to ???. Replace them with the correct information for your selection.
Change the Resize Filter to Bicubic and the drop-down that says NNG to HQ. I'm not sure what difference the Compression Quality makes. Perhaps someone would like to investigate and report back?
Now click the ... button and select the first of your image tiles. They should be called something like 'mytown_1-1.jpg'.
Once the file is selected, click the Calculate: button, then click the Compile Raster Block button.
Wait until it says that the Raster block is saved, then click ... again to select the next file, Calculate, then Compile Raster Block.
When all of the files you created have been processed, put the figures you used in SAS Planet into the Coordinates Raster Map fields on NNG Raster and press the 'Calculate and fill the coordinates' button.
In the left of the window, the E and N coordinates are set for the individual .RST files.
Note that up till now we have used top left and bottom right, but these coordinates are the bottom left corner of each tile!
When SAS Planet makes the tiles, it names them 'across then down'. This means that the tiles physically sit together like this:
[mytown_1-1.jpg] [mytown_2-1.jpg] [mytown_3-1.jpg] [mytown_4-1.jpg]
[mytown_1-2.jpg] [mytown_2-2.jpg] [mytown_3-2.jpg] [mytown_4-2.jpg]
[mytown_1-3.jpg] [mytown_2-3.jpg] [mytown_3-3.jpg] [mytown_4-3.jpg]
and the .rst files have the same names.
However, because NNG Raster processes the tiles in 'up then across' order, they need to be be listed like this:
mytown_1-3.rst
mytown_1-2.rst
mytown_1-1.rst
mytown_2-3.rst
mytown_2-2.rst
mytown_2-1.rst
mytown_3-3.rst
mytown_3-2.rst
mytown_3-1.rst
mytown_4-3.rst
mytown_4-2.rst
mytown_4-1.rst
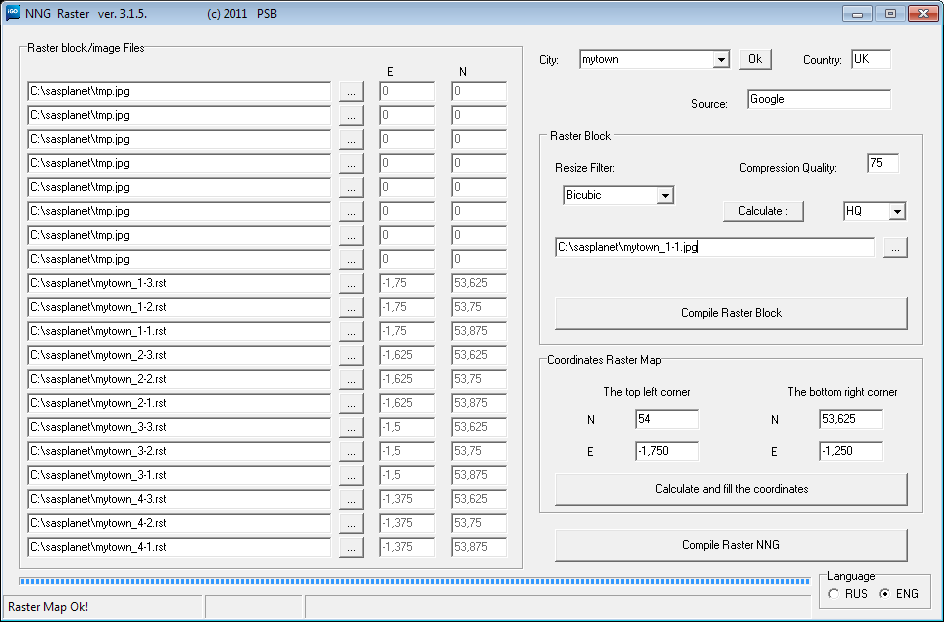
Fill all the spare slots with tmp.jpg (I have no idea why!)
Once you have all got this sorted, click the Compile Raster NNG button and it makes the .raster file in about one second. The file will be called UK-Google-mytown-130824.raster – assuming you said the City was mytown, the Country was UK, the Source Google and you created it on 24th August 2013.
Load the .raster file into iGO
Copy the raster file you just created to a directory called 'raster' in iGO's 'content' directory, enable 'Satellite Image in 3D' in iGo's Map Settings, and you should be good to go.
If iGO claims that there are no satellite images installed, this will be because you are lacking a licence file called iPhone_Primo_ISR_1101__NNG__DEM__3D__PST__CAR__JV_ _Google__TMC___v2.1__.lyc - you will need to source this and put it into your licence folder.
It may not work
This extra load may well make iGO run out of memory and crash. If it keeps crashing, remove all files from the content/raster directory.